


Wednesday, 22 January 2014


Sunday, 12 January 2014
Star and Moonlit Nail art


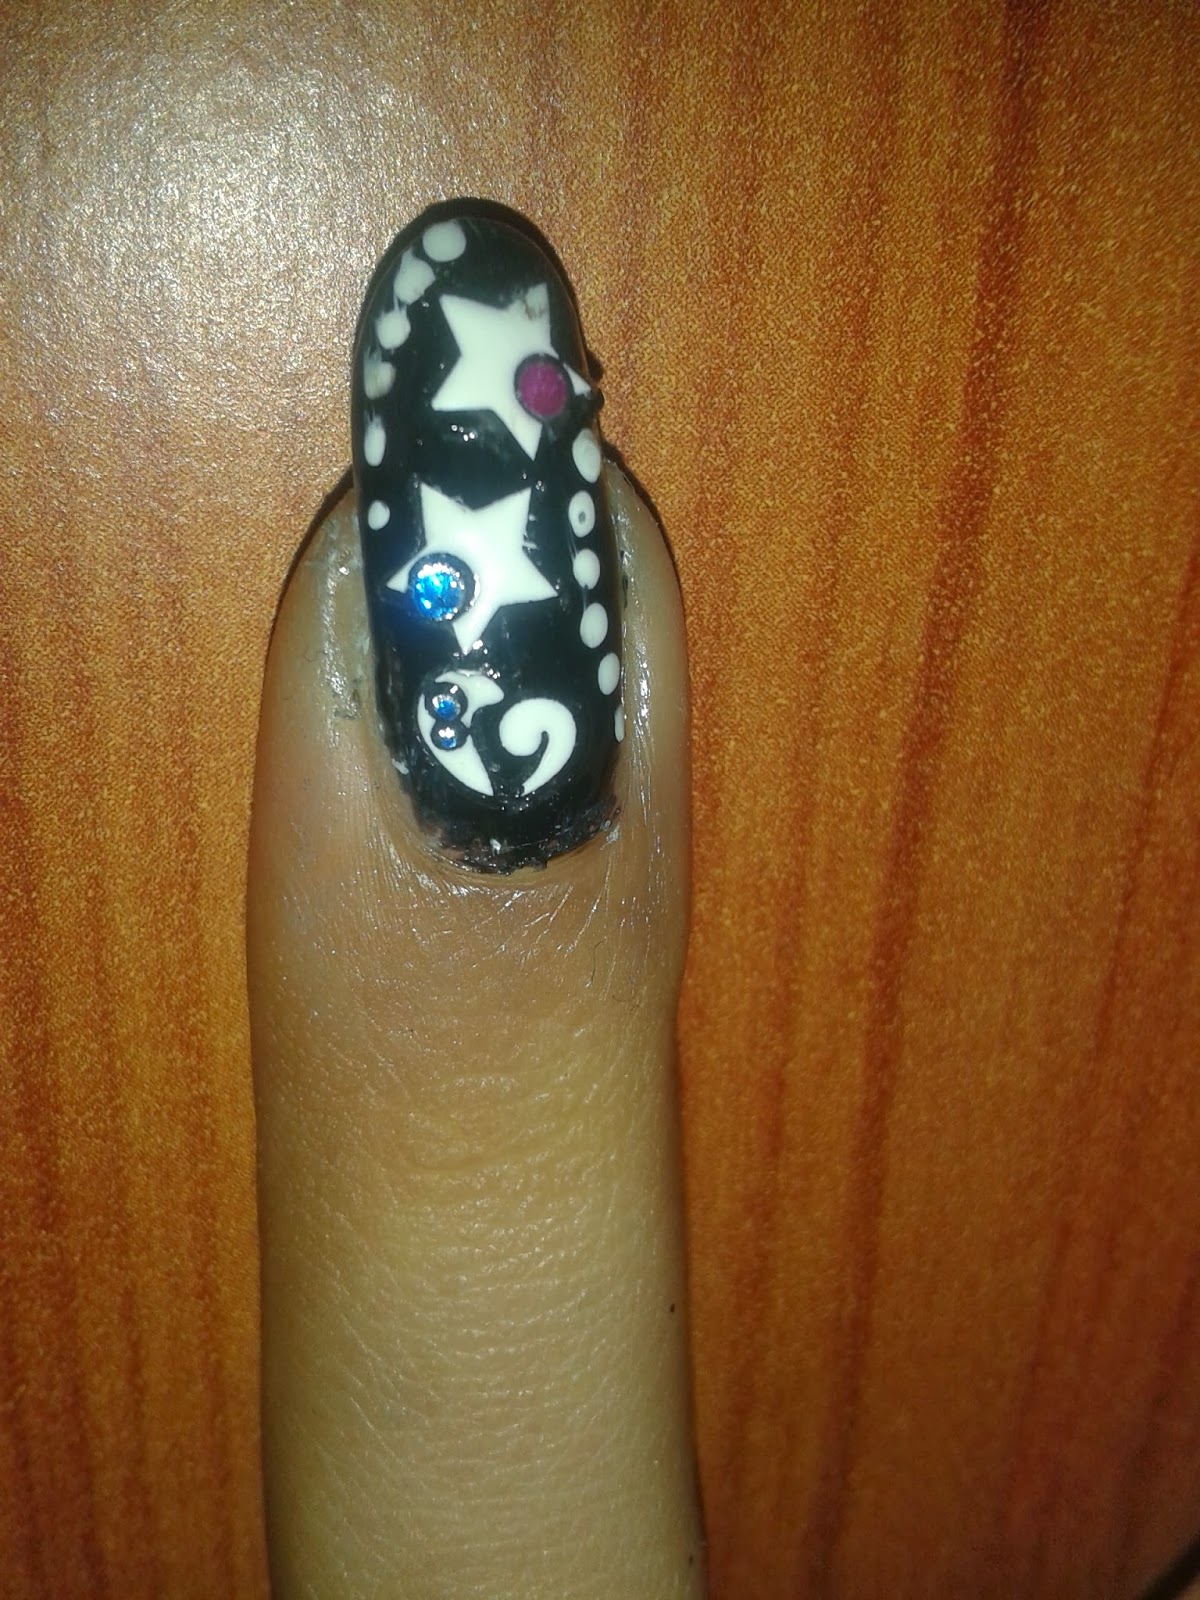 Step 1:
Paint your nails black or dark brown.
Step 2:
Paint white stars .Every nail should be unique and different.
Step 3:
Add a crescent shaped moon.Each nail will have a different design.
Step 4:
Add random dots using a tooth prick and white nail polish,for some nails the dots are in a particular pattern .
Step 5:
Stick pink and blue stones,small pearls,and other kind of rhinestones or stickers to give it a three dimensional look.
Step 6:
To stick rhinestones place them on the nail ,while the nail polish is still wet and press gently,use tweezers(optional) for precision.
Step 7: Seal it with top coat
To stick a pearl rhinestone on the fingers.While the nail paint is wet,place the pearl on the nail,press gently,then seal with two thin layers of top coat.


To apply the sticker gently peel it off,place it on the nail and press gently,then seal with top coat.
Wednesday, 1 January 2014
Glitter nail polish new secret weapon to protect data!!!
Glitter nail-polish is the best tamper-evident seal
 http://boingboing.net/2013/12/31/glitter-nail-polish-is-the-bes-2.html
Glitter nail polish new weapon to protect data
Security experts have discovered a new secret weapon to ensure your laptop and other devices are not tampered with -- glitter nail polish
Find out more
http://timesofindia.indiatimes.com/tech/tech-news/internet/Glitter-nail-polish-new-weapon-to-protect-data/articleshow/28241552.cms?utm_source=facebook.com&utm_medium=referral
Don’t Want Your Laptop Tampered With? Just Add Glitter Nail Polish
Find out more
.http://www.wired.com/threatlevel/2013/12/better-data-security-nail-polish/
Monday, 30 December 2013


Sunday, 29 December 2013
Pink Flowers

Nail art Tutorial
On Sunitha aunty 's hand..( Special Thanks for motivating and volunteering !:-))
Step 1:
Apply a pink nail paint on all the nails..
Step 2:
Take a tooth prick, and make five dots with purple nail paint in the form of a flower.
Step 3:
Using the tooth prick make a central dot with red nail paint.
Step4:
Nail art is done,seal it with top coat,to make it long lasting .
Saturday, 21 December 2013
Blue Checks Tutorial

Things need:blue nail polish,white nail art brush,black nail art brush ,base coat(optional),top coat.Instead of nail art brush you can use any thin brush with black and white nail polish.
step 1:
Apply base coat on clean ,shaped nails.
step 2:
Apply two thin coats of bright sky blue
step 3:
Use white nail art brush paint three lines diagonally along the tip of the nail.
step 4:
Use black nail art brush paint three lines diagonally along the tip of the nail.These lines cross the existing white lines forming a checked design.
step 5:
Apply top coat to seal the nail art.Wait for the paint to dry completely before applying top coat.Nail art is done.
Wednesday, 11 December 2013
Nail Polish Fixes
Preventing air bubbles
Don’t shake your polish bottle. Try rolling it between the palms of your hands instead. Shaking the polish vigorously creates several little bubbles that you can’t see… until they rise! If you absolutely have to shake the bottle to mix your color, do so and then wait about half an hour so all the bubbles settle.Dried Nail Polish
Opening it: Fill a cup with hot water. Holding the nail polish bottle from the bottom, submerge the top in the water and hold it there for a few minutes. This will loosen the dried nail polish. Then wrap a rubber band around the cap and twist it open with ease.Prevent it: Next time you finishing painting your nails, clean up the rim of the bottle with a little polish remover to prevent drips from drying in the cap and when you do see dried polish on the cap, peel it off with tweezers.
Sticky or Thick Nail Polish
Fix it: To restore your nail polish to its original consistency do the following:
Step1.Remove the lid of the nail polish and add one to two drops
of acetone nail polish remover or nail polish thinner. Both can be
purchased at local beauty stores.
Prevent it: Store your nail polish in a cool, dark and dry place .Away from moisture and sunlight. Keeping your nail polish away from warm temperatures and temperature changes is the easiest way to prevent your polish from premature consistency change.Also prevent air from getting inside by closing the cap tightly.Keep the lid on your polish. Sometimes we forget to screw the lids down while doing nail art.The longer you leave the lid off, the more air gets in and the more the polish will thicken and thick polish is a bubble trap!
Hard to Apply Nail Polish:
There is very little I find more annoying than coming home with a brand new bottle of polish only to find out it doesn’t apply well.Some common issues with the formulation of polishes are polishes that come out too thin, polishes that do not layer well, polishes that are too thick, and polish that bubble.
1.Polish is coming out too thin:
Applying a very light base of a white or other neutral color will serve as a more opaque base and allow the color to show up stronger.
2. Polishes is not layering well:Applying a very light base of a white or other neutral color will serve as a more opaque base and allow the color to show up stronger.
That is in when applying the second coat of polish you are seeing a lot of white spots, be sure to allow the first coat to dry completely before applying the second coat. that you I find that around 5 minutes will do the trick. Try doing your nails while watching TV so that you wont mind the wait.
Another trick:Do all your nails one by one,then go for the second coat.
3.Polish is coming out too thick:
Try using the same tips listed about for fixing old nail polishes.That is add nail thinner or acetone. Again, be cautious not to apply too much polish remover. Be sure to roll, not shake the bottles well before applying again.
Subscribe to:
Posts (Atom)